Pages

Friday, March 28, 2014

A Food 3d printer and Why it's an Insult to 3d Printing

All Images courtesy of "Kickstarter"

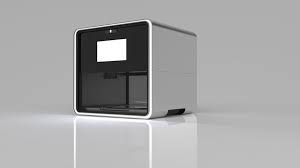
There is a new 3d printer called the Foodini.  In summary it is printer that prepares food, it has reload -able food cartridges with the ingredients for what you want to make.  It contains five cartridges, that are around 4 ounces each.  It is used to prep food, then you have to take it out and cook it on your own. It only used whole ingredients that you put in yourself.

Design
Let me start by saying this thing is beautiful, I would love to see some normal 3d printers look like this.  It kind of looks like a microwave that was designed by apple.  All the components are hidden as they should be with a supposedly consumer 3d printer.  It has a 7 inch full color touch screen and is covered in stainless steel.  It would look really beautiful sitting on any kitchen countertop especially in a modern style house.

Functionality (Please Imagine Me Reading this in my Annoyed Voice)
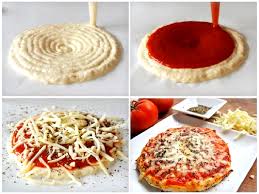
Pizza Making
Let me start by saying that I really like the idea of a food 3d printer, that would allow you to make nearly anything by just placing in some cartridges.  The Foodini fails in many ways for this dream.  To start, you are incredibly limited in what you can make.  The most novel thing that it can make is pizza, and it can't even fully make the pizza.  To make it, it layers down the dough on the unheated build platform, then it adds a layer of sauce, the next logical step would be that it heats up the build chamber and begins adding a layer of cheese.
An example of Layered puke
 However, the next logical step is not what happens, the next step is to take the dough and sauce out of the Foodini, put on the cheese yourself, then put it in the oven.  Also some of the stuff it produces looks like layered puke. This leaves me really curious why someone would by a Foodini, you can easily make the dough into a circle and layer sauce yourself, especially when you have already spent the time to mix all the ingredients to make the dough and sauce.  It can print some cool chocolate pieces, but I think that the novelty of chocolate forming simple objects would ware off and is not worth $1000.


How I Would Make it Better
It has become an odd habit of mine to make things better in my mind the instant I read or hear about them. My first though, was that it needs to be able to complete a simple pizza without human intervention it seems silly, and to be blunt, stupid that a human must intervene and finish it.  It needs to be able to cook the food to do this a heated build chamber and heated build plate must be used. Also, it doesn't need a 7 inch touch screen which is really just a money drain.

On the Filastuder side of things, I am really close to getting it fully working, my attempt using the flexible coupling failed, I had not realized at the time of purchase that it was fully cut down in a spiral to give it flex.  The force needed to spin the drillbit was to great.  I am now getting a fully solid version of it, but it won't be here till next week.  I'll keep you updated on how the new coupler works.

Thursday, March 20, 2014

Why am I excited?

Ok, so let me start by saying im super excited.  My new quadcopter comes in tommorow.  If you don't know, a quad copter is basically a helicopter with 4 rotors instead of 1.  They are balanced by gyros that control how fast each of the motors go.  They are generally faster, more precise, and just generally awesome.

This is not my first arial vehicle, nor quadcopter.  I have always been into flying vehicles, about 8 years ago, I got my first helicopter,  it was amazingly fun.  My mistake however, was to let my brother fly it, he within seconds of getting it he flew it into the mailbox and shattered the blades.  On my next birthday I got a smaller helicopter called a mosquito,  it was nice but pretty slow, and cheap so the motors wore out within a month.  I left flying things for about 3 years.  What got me back was when my dads friend had me review a little 4 ch helicopter that he was planning on putting in mall kiosks. It was awful, has a realistic flight time of 3 minutes.  Needless to say, it got a poor review.  However, I loved flying it(During those precious three minutes before it hit the floor like a Vanguard TV3(Rocket joke anybody?  Okay no))   My next helicopter was one from the same guy, for me to review.  This one was much bigger though, it weighed 5 pounds, and was 3 feet long, it was truly a monster in the sky.  This helicopter was probably the worst piece of shit I have ever used.  For a helicopter of this size I expected it to be able to it to handle 5 mph winds, it could not, the motors were not powerful enough to overcome that little bit of wind.  Besides for that problem, if you landed it slightly to rapidly the co-rotor's hit.  This ended up shattering both the rotors, which is a major problem(You can't really fly a helicopter with no rotors).  Then I got a syma s107, this was my first helicopter than worked well, it was cute, little, and fun.  My next flying vehicle was a small plane, it was high quality, but at high altitude like in Park CIty, it did not have enough power to fly well, it flew like a feather falls, uncontrollable, slow, and light.  My next flying toy was a Syma X1, this was really good, it was fast, stable and high quality.  It met its demise after about 4 months.  When a gust of wind hit, it nocked it down a couple of feet, which sadly was into a mini-ditch, causing it to lose signal and hit a rock wall.  It broke the motor mounts, and severed the wires.

Ok, sorry for the not so abbreviated history of all my flying toys.  Ok, well, that brings me my new quadcopter, the Hubsan x4.  It is much smaller than my last one, my x1 was about 1 foot by one foot, and the X4 is 2.5x2.5 inches.  Don't let the small size fool you, this quad is fast, can go about 20 MPH, do flips, and fly in 10 MPH wind.  So, needless to say I am pretty stoked for it. I also plan on print a blade guard for it,
which is pretty great.

On the 3d printing side of things, I am (finally) building the case for my 3d printer, which will give it a partially heated build chamber, and help my filament not get tangled, hopefully it will be finishes by the next blog post (next week).  Also, I simply could not get the Filastruder in its factory state to work.  I completely rebuilt the base stand to make it stronger, as well as ordered a 10 mm to 11 mm coupler, as the factory is just an auger bit with a little metal rod thats supposed to connect to the motor and not slip under 150 PSI(How?!?!?!, nobody knows).

Friday, March 14, 2014

Why Everyone Should Get a 3d Printer

I don't think that nearly enough people have 3d printers.  So, here is my post on why you should get a 3d printer.

1. Anything you can imagine is real.  If you want to create a new type of cell phone case, go for it...  The only thing that limits you is your mind.  When designing using 3d modeling, it is like making a puzzle and doing the puzzle at the same time.  You have to make sure all your parts fit together and work, and that it's printable on your printer.  However, unlike a normal puzzle in which you solve something that has been solved 1000's of times, what you make is new, and has never been done before by anyone ever.

2. If you are a teenager it helps get you away from the TV.  Whenever I got my Printrbot, my TV watching probably cut in half.  Generally when a teen gets home, they do one of four things, homework, watch TV, play video games, or hangout with people. Three of four of those activities are mindless, 3d printing gives people a fifth option, where they can solve puzzles, while having fun, and possible contributing something good and new to society(by posting on thingiverse).

3. It can save you money, and you can get things speedily. the RepRap project estimates that having a 3d printing can save the average consumer can save $300-2100 a year.  I tend to disagree with this claim, I believe you can save probably $100-$150 a year. However, rather than saving money, its better, because you can have what you want nearly instantly.  If you break your measuring cup, you can have a new one within the hour and still bake the cake in time for dessert, and you avoid having to buy an entire set of cups.( I know a random example, but it could happen)  You could also print out a new case for your phone right when you get your phone, to avoid those 3-7 days before your case comes in the mail and you risk breaking your phone.

However, as much I think that everyone should get a 3d printer right this second, for the average consumer to be satisfied, they should wait till the norms for printer are, above 300 mm/s, 200mm by 200 mm build area, and dual extruder, while costing less that $400. Right now, consumer will be frustrated with failed prints, not enough area to build what they want,  and long wait times.

Friday, March 7, 2014

How to Unclog hot end(extruder) on Your 3d printer with Little Disassembly

Image courtesy of Printrbottalk

 I have been fortunate to not have gotten any clogs in my extruder in the last four months, which is really awesome and means the filament over at matterhackers is really high quality, while also being cheap.  But, last week I got my first clog.  The first thing I did, was identify that it was indeed a clog, second I took the extruder assembly off of the Simple, then looked for a way to take it apart.  After struggling for about ten minutes, I looked upon the interwebs for help.  I still could not find a guide on how to take apart the extruder.  So, I unscrewed all the bolts and the nozzle, and dug inside with a paperclip.  I also tried pushing filament through the top and got nowhere.  Finally, I tried pushing filament into the bottom of the extruder.  It when through with little effort, and cleared out the extruder.  I then reassembled and everything worked well again  Upon assembling, I realized that I could have unclogged the extruder by simply taking off the nozzle and nothing else.  So, Here is my guide on how to fix a clogged extruder with minimal disassembly.

1.  Unscrew the nozzle from the hot end.
2.  Raise the Z axis to max height and heat the hot end to the maximum temperature that you are comfortable with.( For me using the Ubis hot end its about 250 Celsius)
3.  Wait for temperature to be reached.
4.  Remove the filament from the top of the extruder, and put into the bottom of the hot end.
5.  Apply pressure to the filament making it go slowly upwards into the cold end, this the trickiest part of the whole operation, if you go to fast the filament will be liquid coming out of the cold end, which results in a mess.  If you go to slowly the cold end will totally cool it making it extremely hard to get out.  So, just go fairly fast until you see the filament start coming out the of the cold end, then slow down.
6. Cut the filament from the botom of the hot-end and pull the remaining amount through the top of the cold end.
7. Screw the nozzle back on.
8. Manually check that the filament flows.
9. If it does, you are done, if it does not go back to step 1.