Pages

Friday, May 16, 2014

Types of 3d Printing Motion Pros and Cons

If you are just getting into 3d printing you might have noticed that there are many different types of 3d printing motion.  At current there are four kinds, I plan on listing the pros and cons of each style of movement.

1. The Print bed does the X motion, and the extruder does the Y and Z motion, lets call this one Mendel Style.
Image Courtesy of 3ders
Mendel style movement is currently the most popular style.  I attribute this to it's ability to have a fairly large print volume, and its low cost.  This style requires the least amount of smooth rods, and short belt lengths which make it one of the lowest cost methods of movement.

Pros
Low Cost (You can get one of this style for as cheap as $200)
Simplicity (Less parts; less can go wrong)
Print volume(Up to 12X12)

Cons
Low speed(Print beds usually weigh a lot, the printer can only go as fast as it's slowest axis(Z doesn't count).  Max speed of around 90 mm/s).
Lower print quality(The more weight on any one axis, reduces print quality, as it's belts stretch under the extra weight the layers might not line up absolutely perfectly.
Large Footprint (this style of movement makes the bed move on the X so you must have room for the bed to go all the way backwards and forwards off of the base of the printer)

  2. The print bed doesn't move at all, the extruder does all movement, with 3 motors for the X and Y, and a single one for the Z, this one is called Delta. 
Image Courtesy of 3ders
Delta style 3d printers tend to be very unpopular at current, I believe this is because of there high cost.  Personally I really like these printers, they are fast, excellent print quality, and have a small footprint.  They also look amazingly cool while in motion.  They are growing in popularity, lower cost versions seem to be on the way.

Pros
Fast(A print speed of up to 200 mm/s)
Large Print volume(The print volume is nearly unlimited, I have see versions of this that are around 4 feet in diameter)
Small footprint(The print volume is only slightly smaller than the foot print)
Looks Awesome(It just looks awesome while going, it is amazing that it swing a nozzle around with such high accuracy)

Cons
Price(The lowest cost one is around $700)
Large Z Axis height(The X and Y are really efficient in terms of space, but Z has a few extra inches over the print volume)

3. The print bed moves only in the Z, the extruder move in the X and Y directions, lets call this one Ultimaker style.
Image Courtesy of Baracles
This style is gaining quickly in popularity, as the Ultimakers become more popular.  Ultimaker is the main manufacturer that uses this method, it is fast, reliable, and offers great print quality. 

Pros
Speed(Slower than Delta, but still quite quick for a 3d printer)
Amazing print quality(Light weight carriage means better print quality)
Small footprint(It is really efficient in the X, Y, and Z)
Large print volume(I have seen printers using this motion method that are meant to print full sized furniture)

Cons
Price(Ultimaker V2 is the most popular in this category and costs around $2000)

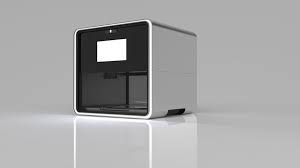
4. This one is a really new kind of motion, the print bed moves in the X and Y, and the extruder moves on the Z, lets call this on MOD-t style.
Image Courtesy of 3ders
I had never heard of this type of motion until yesterday, no one is doing this except a new start-up called MOD-t, the printer launches on the 28th of May.  It moves the bed on all axis except Z.  It seems like it will be really slow and inefficient, but I do not know for sure yet.  It also takes up a huge area for a small print volume.  Due to this printer not being released yet please take all this with a grain of salt.

Pros
Price(Less than $300)
Simplicity(The most simple of all the print types)

Cons
Large footprint(Due to the nature of the beast it takes up 4 times the build plate size)
Speed(Is the slowest of all the methods by far, about 30 mm/s max(Note this number is based of the size of the bed, and amount of seconds it takes to travel an around 40 mm, thus this is a very rough estimate)
Limited print volume(It is confine because with a print bed of around 12 x 12, it would require foot print of 24 x 24 which is unpractical)


Thursday, May 8, 2014

How to Be a Nerd

Image courtesy of "Wordpress"

Here is your informational guide on how to become a nerd written by the near perfect specimen for nerdyness.

1.The first step to becoming a nerd is choosing a favorite TV show, acceptable nerdy TV show are; Doctor Who(of course), Battlestar Galactica(My new favorite show), Sherlock(borderline nerdy), and really any other show that deals with extreme intelligence(Eureka), space/time travel, or sci-fi.  Incorrect nerdy TV shows are things like the Big Bang Theory, this cannot be your favorite nerd show.  It is a comedy, nerd shows are never comedies.

2. After choosing a TV show, the next step is choosing an obsession, while obsession is kind of a strong word for it, you do need to find a hobby.  This one you can have a lot of freedom on, it can be anythings from 3d printing(the best hobby), to record collecting, or theater.  Just pick up something that you are really interested in, common choices are computers, engineering, model planes, ect.  Unacceptable nerd hobbies are video games(while part of being a nerd is playing video games, slobs are the ones who play video games nonstop and it is their hobby.  Don't be a slob.), clothes shopping, and cooking.

3.Now it is time to choose a video game, very common nerd video games are Pokemon, Halo, and strategy based games.  You should play video games irregularly or less than a hour a day if regularly.  Don't spend to much time on video games or you will become a slob.  Don't be a slob.

4.Get good grades, you need a minium of a 3.5 GPA to be a nerd.  It's pretty simple, nerds must always try hard at everything they do even if it is boring to them. Your favorite subjects can be the arts, science or math.

Don't worry if you are missing just one of the categories you can still be a nerd, and trust me you want to be a nerd.  We have PI. Well, that was your daily dose Grant puns.  Have a great day.


Wednesday, April 30, 2014

The Cost of 3D Printing

Image courtesy of "Ctgutter"
My new printer which I planned on doing this blogpost about, but UPS says that the printer will not be delivered until friday.  As blog posts for english are due on friday nights, it would be cutting it rather close doing that. So, as I have just sold my printer I decided to do this post on the cost of 3D printing.

To start I tallied the the cost when I first got into 3d printing.  The cost was $410, about $360 for the Printrbot Simple with volume upgrade, $20 in shipping, and $30 for a roll of filament.  Throughout owning my printer I bought an additional two spools which totalled $60, then I bought a broken Filastruder for $60, and spent about $25 fixing it.  This brings my total $555.   This sounds like a lot of money, and it is. However, I just sold my Printrbot for $330, this is actually more than I though I would get for it, but it makes sense.  I sold it fully assembled, and included about 2 kilos of filament.  Although I have not sold it, if I sold my Filastruder right now I could get just about $200 for it, possibly more.  My assets (the filastruder, and Printrbot Simple) have a combined value of about $530.  Thus if I  quit printing, got up, and left this hobby, and I hadn't of bought my new printer. The hobby of 3D printing would only have costed me $25.  Which isn't that expensive at all, I have had so much fun making things, designing, and building. All these numbers are completely thrown out the window as soon as I bought a newer, more expensive 3D printer.  However, because I plan on keeping my Filastruder the cost of owning this printer is very low, less than $6 a month.  To me this is a lot better and more fun than buying a new Xbox or similar things.


Friday, April 25, 2014

New Printer

"
Prusa I2 courtesy of "boulderhackerspace"
Well, I am finally getting a new printer.  Don't get me wrong, I love my current printer.  However, it does have some problem: it is to small, lacks a heated bed, and has a single extruder.  The size is a problem as some of my projects (currently a chocolate extruder) require more space. The seven inch height, and the seven inch length are not a problem at all, however the four inch width is a major problem for me.  Its nearly no use having 3 extra inches in length because most of my objects are circle or square in shape.  My second problem with my printer is lack of a heated build plate.  For those of you who do not know, a heated build plate is the building platform of printer that is heated.  Heat helps because it makes objects not warp as they cool, and opens up the ability to use materials other than PLA.   My final problem with my current  printer is the lack of a second extruder, what a second extruder does is allow you to build things of any geometry, currently I have to have a completely flat bottom, and no angles below about 20 degrees.

I have been looking for a printer that fits all my requirements for about a month now, it is quite hard to find one for the right price.  I have been checking Ebay for about a month looking for the right printer.  A lot had a heated build plate and were the right size, but lacked a dual extruder which was a major requirement.  I continue to check for about a month until I found the perfect one.

I found a Prusa i2, it a RepRap printer that had been modified to carry a second extruder.  Before I get more into the printer, I'll explain what the RepRap project is.  It is a project to create humanities first self replicating machine that can print most of it's own parts.  What printing you own parts allows you to do is easily create another one and upgrade your current printer, to add for feature, functionality, or make it look better.  It also runs on open source, low cost electronics.  Say for instance that you want to add another extruder, you would design the upgrade, print it, then upgrade your electronics which is usually as simple as wiring in another stepper driver, and tweaking the firmware.  One of the other great things about the RepRaps, is every single part is available for download for free.  So, you can print parts for another RepRap.  I'm pretty excited for it, it should get here on Monday through Friday, so my next blog post will be about it likely.

Onto the specs on it, it has a dual extruder, eight by eight build platform, and a heated bed.  I plan to modify the second extruder to a one mm nozzle size,  this is huge for a printer, the nozzle of the other extruder will be .4 mm.  I have also written some g-code for it which allows the extruder to have different temperatures.  What this allows me to do is use my higher resolution .4 mm nozzle on the perimeter using PLA, and my one mm nozzle on the infill, and for support structures.  I will infill it with ABS, which is soluble in acetone.  What this does is make my prints food safe, and prettier to look at on the outside, while the inside is really strong(ABS is around 3 times stronger than PLA), all while being much faster.

Friday, April 11, 2014

Blog Stats

Image courtesy of "paulbarrs"


My blog is currently at 999 views, so I though that it would be a great time to write about all the stats of my blog.

To start I am going to cover the most viewed articles.  By far my most viewed articles was a guide on how to smooth PLA prints with Dichloromethane, that post got 40 views.  This is likely because at the time of writing it, it was the most in-depth guide on how to smooth PLA prints.  My next highest scoring was Why I Really don't Have a Girlfriend, this post received about 22 views.  It is like this post, but for the statistics of why I don't have a girlfriend.  After that the next post was a review of the Printrbot Simple, it received 20 views.  My forth highest scoring blog post Last Minute Valentines Prep, it received just 15 views.

Analysis
It becomes clear that the most favored blog posts, are the ones that deal with 3d printing and the ones that deal with relationships.  However, the only 3d printing blog posts that are successful are the ones that deal with specific guides(usually through my own experimentation).  Any of the posts that were about general 3d printing, tended to score the lowest, at just 3 page views each.  This makes sense, people might do a specific search for how to smooth PLA prints with dichloromethane.  Then as their are very few other sources, my relatively unpopular blog can appear nearer to the top of Google.  The other posts that scored high are about relationships, or Valentines day.  Even though the Valentines one turned into more of a 3d printing post(as everything I write somehow does). This to makes sense because the audience of my blog are split into two main sectors, school friend and random people on the interweb who want to learn of 3d printing.  Teenagers(my school friends) are borderline obsessed with relationships, thus anything that even slightly pertains to relationships, they are more likely to click.

Other Random Stats

  • I am proud to announce the the most popular browser used to access my page is Google Chrome, Internet Explorer A.K.A. the browser most preferred by cavemen, only took up 8% of the total browser usage.
  • I am sad to say that the majority of my viewers use a Mac(55%), but this does make sense as all of our school computers are Macs. Windows, took up far less, at just 28%  Also, another sad fact, the most popular mobile operating system to access my page was IOS, at 28 views, and a mere 19 views from Android. 
  • I have 20 views from Germany(no idea why).
  • My biggest single traffic source is Vampire stat(a spambot), which accounts for nearly 15% of my page views, the second biggest single traffic source is my friend Devon's blog at just 3%.

Friday, April 4, 2014

Quadcopter and My Filastruder Is working

Image Courtesy of Rotor Concepts
This week has been quite eventful and exciting, new quadcopter, and I finally got the Filastruder working.

Filastruder
Today, I finally got in my non-flexible motor coupling.  I have been working for the past month attempting to get my Filastruder working, My first try I used a flexible coupling, but it ended up not being able to work under the extreme pressure required, and nearly unspirled itself.  After that happened, I found a much stronger coupling and ordered that.  It was from China, so it took nearly two agonizing weeks to get here.  Once it arrived today, I had to drill it out because it was about 3mm to small, after that it fit perfectly.  It has been running flawlessly producing filament for the last three hours, from initial measurements, it appears to be at a fairly constant diameter and no major kinks.

Quadcopter
You might have seen my previous post that featured my not so abbreviated history of all my flying objects. I will attempt to keep this short and sweet, so here we go.  I got a new quadcopter on wednesday, my Father got home from Las Vegas,  and there he decided to get me a quadcopter.  This is unlike any other RC aircraft I have every owned, it gets out of the toy grade RC range.  It gets into a more hobby grade RC aircraft, it is far faster, far bigger, and has a far longer flight time.  It is the Rotor Concepts Discovery.  It offers tons of features not found on any toy grade RC aircraft.  It has a 30 minute non-stop flight time, can carry up to one pound(which is more than most cameras weigh), has a 1.5 mile range, and has a few super super cool GPS features.

 Two of the coolest GPS features are stay, and return home.  In stay mode, you set a location that you want it to stay at and it stays there, if the wind blows it off course it will automatically fly back to that location, I wish I had this when I used to play football.  I would be pretty amazing to set it to stay 100 feet above the football field, and have it film the game from there.  The other feature is return home, whenever the quadcopter gets out of range or gets on low battery. It will return to position that you began flying from.  I have not been able to go to an open field and fly it yet because of 20 MPH winds(it is rated for 15 MPH winds), however I have flown it in my backyard which has less wind and it seems stable.  Once, the wind dies, I will go to a field and test all the GPS features, then write a full review.

Friday, March 28, 2014

A Food 3d printer and Why it's an Insult to 3d Printing

All Images courtesy of "Kickstarter"

There is a new 3d printer called the Foodini.  In summary it is printer that prepares food, it has reload -able food cartridges with the ingredients for what you want to make.  It contains five cartridges, that are around 4 ounces each.  It is used to prep food, then you have to take it out and cook it on your own. It only used whole ingredients that you put in yourself.

Design
Let me start by saying this thing is beautiful, I would love to see some normal 3d printers look like this.  It kind of looks like a microwave that was designed by apple.  All the components are hidden as they should be with a supposedly consumer 3d printer.  It has a 7 inch full color touch screen and is covered in stainless steel.  It would look really beautiful sitting on any kitchen countertop especially in a modern style house.

Functionality (Please Imagine Me Reading this in my Annoyed Voice)
Pizza Making
Let me start by saying that I really like the idea of a food 3d printer, that would allow you to make nearly anything by just placing in some cartridges.  The Foodini fails in many ways for this dream.  To start, you are incredibly limited in what you can make.  The most novel thing that it can make is pizza, and it can't even fully make the pizza.  To make it, it layers down the dough on the unheated build platform, then it adds a layer of sauce, the next logical step would be that it heats up the build chamber and begins adding a layer of cheese.
An example of Layered puke
 However, the next logical step is not what happens, the next step is to take the dough and sauce out of the Foodini, put on the cheese yourself, then put it in the oven.  Also some of the stuff it produces looks like layered puke. This leaves me really curious why someone would by a Foodini, you can easily make the dough into a circle and layer sauce yourself, especially when you have already spent the time to mix all the ingredients to make the dough and sauce.  It can print some cool chocolate pieces, but I think that the novelty of chocolate forming simple objects would ware off and is not worth $1000.


How I Would Make it Better
It has become an odd habit of mine to make things better in my mind the instant I read or hear about them. My first though, was that it needs to be able to complete a simple pizza without human intervention it seems silly, and to be blunt, stupid that a human must intervene and finish it.  It needs to be able to cook the food to do this a heated build chamber and heated build plate must be used. Also, it doesn't need a 7 inch touch screen which is really just a money drain.

On the Filastuder side of things, I am really close to getting it fully working, my attempt using the flexible coupling failed, I had not realized at the time of purchase that it was fully cut down in a spiral to give it flex.  The force needed to spin the drillbit was to great.  I am now getting a fully solid version of it, but it won't be here till next week.  I'll keep you updated on how the new coupler works.