Pages

Showing posts with label 3d printing. Show all posts

Wednesday, April 30, 2014

The Cost of 3D Printing

Image courtesy of "Ctgutter"
My new printer which I planned on doing this blogpost about, but UPS says that the printer will not be delivered until friday.  As blog posts for english are due on friday nights, it would be cutting it rather close doing that. So, as I have just sold my printer I decided to do this post on the cost of 3D printing.

To start I tallied the the cost when I first got into 3d printing.  The cost was $410, about $360 for the Printrbot Simple with volume upgrade, $20 in shipping, and $30 for a roll of filament.  Throughout owning my printer I bought an additional two spools which totalled $60, then I bought a broken Filastruder for $60, and spent about $25 fixing it.  This brings my total $555.   This sounds like a lot of money, and it is. However, I just sold my Printrbot for $330, this is actually more than I though I would get for it, but it makes sense.  I sold it fully assembled, and included about 2 kilos of filament.  Although I have not sold it, if I sold my Filastruder right now I could get just about $200 for it, possibly more.  My assets (the filastruder, and Printrbot Simple) have a combined value of about $530.  Thus if I  quit printing, got up, and left this hobby, and I hadn't of bought my new printer. The hobby of 3D printing would only have costed me $25.  Which isn't that expensive at all, I have had so much fun making things, designing, and building. All these numbers are completely thrown out the window as soon as I bought a newer, more expensive 3D printer.  However, because I plan on keeping my Filastruder the cost of owning this printer is very low, less than $6 a month.  To me this is a lot better and more fun than buying a new Xbox or similar things.


Friday, April 25, 2014

New Printer

"
Prusa I2 courtesy of "boulderhackerspace"
Well, I am finally getting a new printer.  Don't get me wrong, I love my current printer.  However, it does have some problem: it is to small, lacks a heated bed, and has a single extruder.  The size is a problem as some of my projects (currently a chocolate extruder) require more space. The seven inch height, and the seven inch length are not a problem at all, however the four inch width is a major problem for me.  Its nearly no use having 3 extra inches in length because most of my objects are circle or square in shape.  My second problem with my printer is lack of a heated build plate.  For those of you who do not know, a heated build plate is the building platform of printer that is heated.  Heat helps because it makes objects not warp as they cool, and opens up the ability to use materials other than PLA.   My final problem with my current  printer is the lack of a second extruder, what a second extruder does is allow you to build things of any geometry, currently I have to have a completely flat bottom, and no angles below about 20 degrees.

I have been looking for a printer that fits all my requirements for about a month now, it is quite hard to find one for the right price.  I have been checking Ebay for about a month looking for the right printer.  A lot had a heated build plate and were the right size, but lacked a dual extruder which was a major requirement.  I continue to check for about a month until I found the perfect one.

I found a Prusa i2, it a RepRap printer that had been modified to carry a second extruder.  Before I get more into the printer, I'll explain what the RepRap project is.  It is a project to create humanities first self replicating machine that can print most of it's own parts.  What printing you own parts allows you to do is easily create another one and upgrade your current printer, to add for feature, functionality, or make it look better.  It also runs on open source, low cost electronics.  Say for instance that you want to add another extruder, you would design the upgrade, print it, then upgrade your electronics which is usually as simple as wiring in another stepper driver, and tweaking the firmware.  One of the other great things about the RepRaps, is every single part is available for download for free.  So, you can print parts for another RepRap.  I'm pretty excited for it, it should get here on Monday through Friday, so my next blog post will be about it likely.

Onto the specs on it, it has a dual extruder, eight by eight build platform, and a heated bed.  I plan to modify the second extruder to a one mm nozzle size,  this is huge for a printer, the nozzle of the other extruder will be .4 mm.  I have also written some g-code for it which allows the extruder to have different temperatures.  What this allows me to do is use my higher resolution .4 mm nozzle on the perimeter using PLA, and my one mm nozzle on the infill, and for support structures.  I will infill it with ABS, which is soluble in acetone.  What this does is make my prints food safe, and prettier to look at on the outside, while the inside is really strong(ABS is around 3 times stronger than PLA), all while being much faster.

Friday, April 11, 2014

Blog Stats

Image courtesy of "paulbarrs"


My blog is currently at 999 views, so I though that it would be a great time to write about all the stats of my blog.

To start I am going to cover the most viewed articles.  By far my most viewed articles was a guide on how to smooth PLA prints with Dichloromethane, that post got 40 views.  This is likely because at the time of writing it, it was the most in-depth guide on how to smooth PLA prints.  My next highest scoring was Why I Really don't Have a Girlfriend, this post received about 22 views.  It is like this post, but for the statistics of why I don't have a girlfriend.  After that the next post was a review of the Printrbot Simple, it received 20 views.  My forth highest scoring blog post Last Minute Valentines Prep, it received just 15 views.

Analysis
It becomes clear that the most favored blog posts, are the ones that deal with 3d printing and the ones that deal with relationships.  However, the only 3d printing blog posts that are successful are the ones that deal with specific guides(usually through my own experimentation).  Any of the posts that were about general 3d printing, tended to score the lowest, at just 3 page views each.  This makes sense, people might do a specific search for how to smooth PLA prints with dichloromethane.  Then as their are very few other sources, my relatively unpopular blog can appear nearer to the top of Google.  The other posts that scored high are about relationships, or Valentines day.  Even though the Valentines one turned into more of a 3d printing post(as everything I write somehow does). This to makes sense because the audience of my blog are split into two main sectors, school friend and random people on the interweb who want to learn of 3d printing.  Teenagers(my school friends) are borderline obsessed with relationships, thus anything that even slightly pertains to relationships, they are more likely to click.

Other Random Stats

  • I am proud to announce the the most popular browser used to access my page is Google Chrome, Internet Explorer A.K.A. the browser most preferred by cavemen, only took up 8% of the total browser usage.
  • I am sad to say that the majority of my viewers use a Mac(55%), but this does make sense as all of our school computers are Macs. Windows, took up far less, at just 28%  Also, another sad fact, the most popular mobile operating system to access my page was IOS, at 28 views, and a mere 19 views from Android. 
  • I have 20 views from Germany(no idea why).
  • My biggest single traffic source is Vampire stat(a spambot), which accounts for nearly 15% of my page views, the second biggest single traffic source is my friend Devon's blog at just 3%.

Friday, April 4, 2014

Quadcopter and My Filastruder Is working

Image Courtesy of Rotor Concepts
This week has been quite eventful and exciting, new quadcopter, and I finally got the Filastruder working.

Filastruder
Today, I finally got in my non-flexible motor coupling.  I have been working for the past month attempting to get my Filastruder working, My first try I used a flexible coupling, but it ended up not being able to work under the extreme pressure required, and nearly unspirled itself.  After that happened, I found a much stronger coupling and ordered that.  It was from China, so it took nearly two agonizing weeks to get here.  Once it arrived today, I had to drill it out because it was about 3mm to small, after that it fit perfectly.  It has been running flawlessly producing filament for the last three hours, from initial measurements, it appears to be at a fairly constant diameter and no major kinks.

Quadcopter
You might have seen my previous post that featured my not so abbreviated history of all my flying objects. I will attempt to keep this short and sweet, so here we go.  I got a new quadcopter on wednesday, my Father got home from Las Vegas,  and there he decided to get me a quadcopter.  This is unlike any other RC aircraft I have every owned, it gets out of the toy grade RC range.  It gets into a more hobby grade RC aircraft, it is far faster, far bigger, and has a far longer flight time.  It is the Rotor Concepts Discovery.  It offers tons of features not found on any toy grade RC aircraft.  It has a 30 minute non-stop flight time, can carry up to one pound(which is more than most cameras weigh), has a 1.5 mile range, and has a few super super cool GPS features.

 Two of the coolest GPS features are stay, and return home.  In stay mode, you set a location that you want it to stay at and it stays there, if the wind blows it off course it will automatically fly back to that location, I wish I had this when I used to play football.  I would be pretty amazing to set it to stay 100 feet above the football field, and have it film the game from there.  The other feature is return home, whenever the quadcopter gets out of range or gets on low battery. It will return to position that you began flying from.  I have not been able to go to an open field and fly it yet because of 20 MPH winds(it is rated for 15 MPH winds), however I have flown it in my backyard which has less wind and it seems stable.  Once, the wind dies, I will go to a field and test all the GPS features, then write a full review.

Friday, March 28, 2014

A Food 3d printer and Why it's an Insult to 3d Printing

All Images courtesy of "Kickstarter"

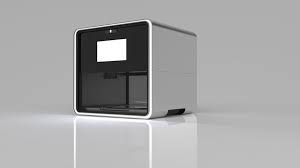
There is a new 3d printer called the Foodini.  In summary it is printer that prepares food, it has reload -able food cartridges with the ingredients for what you want to make.  It contains five cartridges, that are around 4 ounces each.  It is used to prep food, then you have to take it out and cook it on your own. It only used whole ingredients that you put in yourself.

Design
Let me start by saying this thing is beautiful, I would love to see some normal 3d printers look like this.  It kind of looks like a microwave that was designed by apple.  All the components are hidden as they should be with a supposedly consumer 3d printer.  It has a 7 inch full color touch screen and is covered in stainless steel.  It would look really beautiful sitting on any kitchen countertop especially in a modern style house.

Functionality (Please Imagine Me Reading this in my Annoyed Voice)
Pizza Making
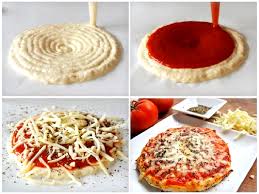
Let me start by saying that I really like the idea of a food 3d printer, that would allow you to make nearly anything by just placing in some cartridges.  The Foodini fails in many ways for this dream.  To start, you are incredibly limited in what you can make.  The most novel thing that it can make is pizza, and it can't even fully make the pizza.  To make it, it layers down the dough on the unheated build platform, then it adds a layer of sauce, the next logical step would be that it heats up the build chamber and begins adding a layer of cheese.
An example of Layered puke
 However, the next logical step is not what happens, the next step is to take the dough and sauce out of the Foodini, put on the cheese yourself, then put it in the oven.  Also some of the stuff it produces looks like layered puke. This leaves me really curious why someone would by a Foodini, you can easily make the dough into a circle and layer sauce yourself, especially when you have already spent the time to mix all the ingredients to make the dough and sauce.  It can print some cool chocolate pieces, but I think that the novelty of chocolate forming simple objects would ware off and is not worth $1000.


How I Would Make it Better
It has become an odd habit of mine to make things better in my mind the instant I read or hear about them. My first though, was that it needs to be able to complete a simple pizza without human intervention it seems silly, and to be blunt, stupid that a human must intervene and finish it.  It needs to be able to cook the food to do this a heated build chamber and heated build plate must be used. Also, it doesn't need a 7 inch touch screen which is really just a money drain.

On the Filastuder side of things, I am really close to getting it fully working, my attempt using the flexible coupling failed, I had not realized at the time of purchase that it was fully cut down in a spiral to give it flex.  The force needed to spin the drillbit was to great.  I am now getting a fully solid version of it, but it won't be here till next week.  I'll keep you updated on how the new coupler works.

Friday, March 14, 2014

Why Everyone Should Get a 3d Printer

I don't think that nearly enough people have 3d printers.  So, here is my post on why you should get a 3d printer.

1. Anything you can imagine is real.  If you want to create a new type of cell phone case, go for it...  The only thing that limits you is your mind.  When designing using 3d modeling, it is like making a puzzle and doing the puzzle at the same time.  You have to make sure all your parts fit together and work, and that it's printable on your printer.  However, unlike a normal puzzle in which you solve something that has been solved 1000's of times, what you make is new, and has never been done before by anyone ever.

2. If you are a teenager it helps get you away from the TV.  Whenever I got my Printrbot, my TV watching probably cut in half.  Generally when a teen gets home, they do one of four things, homework, watch TV, play video games, or hangout with people. Three of four of those activities are mindless, 3d printing gives people a fifth option, where they can solve puzzles, while having fun, and possible contributing something good and new to society(by posting on thingiverse).

3. It can save you money, and you can get things speedily. the RepRap project estimates that having a 3d printing can save the average consumer can save $300-2100 a year.  I tend to disagree with this claim, I believe you can save probably $100-$150 a year. However, rather than saving money, its better, because you can have what you want nearly instantly.  If you break your measuring cup, you can have a new one within the hour and still bake the cake in time for dessert, and you avoid having to buy an entire set of cups.( I know a random example, but it could happen)  You could also print out a new case for your phone right when you get your phone, to avoid those 3-7 days before your case comes in the mail and you risk breaking your phone.

However, as much I think that everyone should get a 3d printer right this second, for the average consumer to be satisfied, they should wait till the norms for printer are, above 300 mm/s, 200mm by 200 mm build area, and dual extruder, while costing less that $400. Right now, consumer will be frustrated with failed prints, not enough area to build what they want,  and long wait times.

Friday, March 7, 2014

How to Unclog hot end(extruder) on Your 3d printer with Little Disassembly

Image courtesy of Printrbottalk

 I have been fortunate to not have gotten any clogs in my extruder in the last four months, which is really awesome and means the filament over at matterhackers is really high quality, while also being cheap.  But, last week I got my first clog.  The first thing I did, was identify that it was indeed a clog, second I took the extruder assembly off of the Simple, then looked for a way to take it apart.  After struggling for about ten minutes, I looked upon the interwebs for help.  I still could not find a guide on how to take apart the extruder.  So, I unscrewed all the bolts and the nozzle, and dug inside with a paperclip.  I also tried pushing filament through the top and got nowhere.  Finally, I tried pushing filament into the bottom of the extruder.  It when through with little effort, and cleared out the extruder.  I then reassembled and everything worked well again  Upon assembling, I realized that I could have unclogged the extruder by simply taking off the nozzle and nothing else.  So, Here is my guide on how to fix a clogged extruder with minimal disassembly.

1.  Unscrew the nozzle from the hot end.
2.  Raise the Z axis to max height and heat the hot end to the maximum temperature that you are comfortable with.( For me using the Ubis hot end its about 250 Celsius)
3.  Wait for temperature to be reached.
4.  Remove the filament from the top of the extruder, and put into the bottom of the hot end.
5.  Apply pressure to the filament making it go slowly upwards into the cold end, this the trickiest part of the whole operation, if you go to fast the filament will be liquid coming out of the cold end, which results in a mess.  If you go to slowly the cold end will totally cool it making it extremely hard to get out.  So, just go fairly fast until you see the filament start coming out the of the cold end, then slow down.
6. Cut the filament from the botom of the hot-end and pull the remaining amount through the top of the cold end.
7. Screw the nozzle back on.
8. Manually check that the filament flows.
9. If it does, you are done, if it does not go back to step 1.


Friday, February 28, 2014

This week in 3d Printing:

Image courtesy of Filastruder
It has been about two or three weeks since I last blogged, because of break and I've been quite busy.  Here is a list of all the things i've done that are printer related.

1. I finally installed my build volume upgrade for the Printrbot Simple(it only took about three months, I might have procrastinated... a bit), the reason I have been putting it off, is the rods that came with it were about .75 inches to short so I made a wrap-around for the smooth rod that interfaces with the wood.  If you have the same problem of the rods being cut to short, just leave a comment and I'll email you the rod extender.  Now I have an eight inch by four inch but 8 inch build volume, i've been printing so much more now(which can get quite costly) this brings me onto the next point. 

2. I bought a broken Filastruder, for only $60 plus it came with eleven pounds of PLA.  What the Filastruder does, is convert super cheap plastic pellets into 3d printing filament, which is quite expensive.  I got it extremely cheaply(They sell for $300 plus I got about $40 in plastic) because it was broken, he said it had a problem with the thermocouple, auger, and hopper. After getting it, I noticed it was assembled horribly, wood was at an eighty degree angle, and the hopper was completely destroyed, however after dissolving the ABS left in the funnel with acetone,  I discovered the auger was completely fine.  Two days ago, I got everything running individually, the motor, PID(which was wired incorrectly), and the heater.  The Thermocouple wasn't broken, it was just cut to short, so I ordered a new one for $5, and printed a new hopper for about $1.50.  I have to get everything reassembled once I get the thermocouple in.   Hopefully in less than a week I should have a fully functional Filastruder, that in the end only will cost a bit under $67.00!

3. I am also building a partially heated build chamber for my simple, because sometimes i'll open the window if my room needs fresh air.  Sadly, when I do that, it cools down the printer too much, causing the layers below to freeze, which then crumbles and ruins the print.  The build chamber will get up to about hundred degrees using the excess heat put off from the 450 degree extruder.  I have all the parts printed and the the plexiglass cut, it came out to about $30 after all.  I designed the hinges(for the door to the printer) and the angled bits (to make sure everything lines up), if you want the files, leave a comment and I will happily email them to you.

4. The phone case I have been designing for the past three or so months, just got a major redesign(made possible through the build volume upgrade).  It is now nearly completely done, which I am super psyched for.

5. Last week I was replacing the 400 grit sandpaper on the vinyl tube, with 70 grit for better traction, after sanding off all the additional sandpaper(I know sanding sandpaper sounds stupid, but I had to because It had been super glued on)I was washing off the tube, when I dropped it down the drain...( I might have said a curse word, or two) Without the vinyl tube the printer simply(see what I did there Printrbot simple, simply, it's funny) can't run.  Without a running printer to print a tube substitute, I thought I was going to be without my printer all break.  Then I went to my closet and saw that I had three or four extra plastic hanger.  I quickly took one, cut an inch long section from it, then using the drillpress, drilled a holed, then acted as if I were a CNC mill and slowly let the drill press take material fromt the inside walls, until I had a perfectly fitting piece. I then glued the 70 grit on and my printer has been running perfectly.  

Well, thats all for this week, next week will likely be on how everything turned out(the case, the Filastruder, and the build chamber).  

Thursday, February 13, 2014

Last Minute Valentines Prep

Well, its that special time greeting card and companies make money, and I feel especially awkward.  This year my friends and I decided to get valentines for each other.  I ordered red filament just for the occasion, I planning on it getting in on yesterday, but alas it did not so I waited until today, the day before valentines day to print all of my friends things so I could use red.  It still has not come in so, right now it is six P.M. and I have to print four items in less than five hours.  I'll keep you guys posted on how it's going every hour.


 7:00 P.M. My struggles have just begun. I found what I am to make everybody, a Dino head for Emi (long story behind this), A twisted heart vase for Sky, and a puzzle heart box for Lulu. Plus two additional twisted heart vases just incase anyone has a valentine for me, and I don't for them.   Here are the beginning of my struggles  I updated my repetier host earlier today and I dislike the new version, it's probably easier to use for some people, but I liked it the old way.  Struggle two, The Dino head intended for Emi is a forty two megabyte file.  By twenty first century file size, that is tiny.  But compared to normal object file sizes its gigantic.   Most of my files are below one MB.  When attempting to load this file, my computer crashed three times (my computer is an adware infected dinosaur, that I would like to see burn in a blaze of hatred).  After the third time of crashing I gave up on that Dino head.  I have started on slicing the heart vase for Sky(this is now what Emi is also getting now).

7:30 P.M. Slicing has just finished after 30 long minutes, normally things take 45 seconds, but because of the twisted hi-res features,  It had 13,000 faces, for a total of 28,000 lines of G-code.  However, due to the thin walls, it will only take 30 minutes to print.

8:00 P.M. The print just finished a minute ago, I took it off, and realized that it had made the hole perimeter 1 layer thick, do you know how strong .3mm of PLA is?  Well, about as strong as half of a toothpick.  So needless to say it failed.  I resized it making it twice as tall and adding 2 layers to the sides instead of 1.  I just started slicing, I'll tell you guys when it's done.

9:00 P.M. 23,000 faces, nearly 50,000 lines of g-code.  It just started a few minutes ago, and it will take an estimated 1 hour and four minutes. Right now I see, that it will be a late night.  I'll be back in an hour to tell you guys how it went.

10:00 P.M.  Well, its certainly big enough, however, it's still just a single walled thing.  But, I have an awesome Idea to make it strong enough.  I plan to spray the outer edges with an aerosol version of plastidip, this will help bind all the layer together.   Bye now, I must go print my remaining two, lulu is also now getting the twisted heart vase.

10:01 P.M.  Oh, shitty crap!  I deleted my g-code and have no time to re-slice it.  Luckily though, I saved the smaller version, so that will have to do for now. It will do better because I will actually have time to sleep tonight.

11:00  P.M.  Everything is printed.  I am just about to rubberize them.

11:15 P.M.  I just rubberized everything and Will be getting them out in the morning.


Friday, January 24, 2014

Review of the Printrbot Simple

Image courtesy of "Printrbot"
Let me start by saying I have a love hate relationship with the Printrbot Simple.  Whenever it works flawlessly I love it, whenever its doesn't, not so much.  I will judge it on the following criteria, quality of print, speed, and reliability.

The quality of a print of this printer when it works well is actually quite good, it has an advertised layer resolution of 100 microns, however, I got better results at 150 microns, at 100 microns you really have to have everything tuned perfectly which is nearly impossible to do on a $300 printer.  I actually regularly print at 300 microns because it gets it done much quicker.  Then after printing at 300 microns you can give it 10 second dichloromethelyne bath and it can bring it up to the quality of plastic injected.   Because it uses strings as belts(I know, its weird) there are some very small vibrations that occur throwing off the layer stacking by around 100 microns on some of the layer.  

This printer is slow, one of the slowest printer on the market.  I can run around 30 mm/second for perimeters, and 70mm/second for infil.  To put this in a cogent perspective, its took 2 hours to print my spanish project, and about 45 minutes to print the 1 inch tall halo statue. This was printing at 350 microns, if you were to do 100 microns it would take roughly 3 times as long, which I might add makes it nearly impossible to print the spanish project because I do not trust this printer to run for 6 hours unhindered.

Want to hear a funny joke: reliability!  But seriously it is unreliable.  I blame this mostly on the strings that are used instead of belts.  With belts, you simply tighten once and are good to go, this is not the case with the string at all.  It is constantly vibrating itself loose from the two holding screws, it must always be tight( get some pliers wrap it around the string and twist the pliers as hard are you can, then and only then can the quality of prints be reasonable).  Also the sand paper that should be super glued to the plastic wrap of the belt motor sometimes gets loose.  The point is that you have to constantly tighten the belts, around pretty much every other day.  The bed also has to be "leveled", I say "leveled" because it is not really leveling, it is getting the Y axis angle parallel to the print bed. You have to do this because unlike most $1000 3d printer that use dual support on both ends of the Y axis, the simple just uses it on one end, this would be okay if it wasn't held together with wood and zipties.  So to sum it up the Y axis leans about 6 degrees.

Software, the software is what is used on pretty much all open source 3d printers, Repitier Host.  It is pretty simple to use if you know what you are doing, all you must do is scale it to fit perfectly(it is a little harder on a printer like this with such a tiny print bed).

In conclusion, despite the unreliability and slow print time, I still must recommend it if you are willing to deal with the lack of reliability and constant repairs.  Also I have a plan to make this printer amazing, stay tuned next week for how I plan to do it.

Friday, January 10, 2014

To Buy or Not To Buy

Image courtesy of "Google"
So, I am quite upset at this exact point in time.  My digitizer on my phone broke(for those non-phone nerds, the digitizer is the part of the phone that registers touch inputs).  So with the broken digitizer my phone basically is the most expensive battery powered pocket watch ever.  It cannot make calls, text, or do anything remotely useful.  Last night I attempted to change my cell service to an old Blackberry (Blackberry can go die in a hole, oh wait they already did, BURN!) But that did not work, so right now it is day 3 with no phone, and I hate it.  How did people live in the olden times? What did they do on the bus? When they were bored? It must have been an awful thing.  I also can't contact anyone, at all my mother nor my friends.  Today, I am will hopefully get the HTC Hero to connect to the network, the Hero is one of the first Android, made in a time a before time.  Ok, they might have been a hyperbole, but it actually is really old.   Anyway the Hero is not a long term solution, so now I am presented with two paths, buy a digitizer for about $60 to repair my screen on the Optimus G.  Or buy a new phone, even though my contract is not yet expired.

 Normally I would just buy a digitizer, but my phone has been having other problems as well, sometimes whenever I type huge blocks of text, it will delete it by pressing the back button with no way to stop it. It's to unpopular a phone, so many companies do not support games on it, and it has random glitches, where it thinks the keyboard does not exist. Not to mention WI-FI needing to be constantly reconnected.  So, at this point I know I want a new phone, but the choice is quite hard, because my contract is not yet expired on Sprint, and once it does my dad is moving us to a new carrier.  So, it needs to be a quadband phone, meaning it can get into any network, CDMA, GSM, LTE, or WCDMA.  Which narrows my options to really only one phone, the Nexus 5.  The Nexus 5 is made by a partner ship between Google and LG(why they don't use Motorola, which they already own is beyond me).  This is really nice because it is subsidized by Google, and is the phone made by Google to show off Android to developers, and consumers.  Also if I got the Nexus 5, I could design a new case for it, which is always fun.

On another 3d printing note, I did not win the contest for the Ultimaker.  However, they were nice enough to ship me my entry to my house for free.  It looks really great, it shows how great the UP is at making things, honestly the layer stacking compared to my Printrbot, make the Printrbot look like shit.  Then again that is expected as the UP is the same size, but three times the cost.

Thursday, November 21, 2013

Multidesign Cookie Cutter

Image courtesy of "My MIni Factory"
There is a contest put on by My Mini Factory, to see who can produce the best 3d printable Christmas design.  The key word here is printable.  Most people think a 3d printer can produce anything, they are right and wrong, they are right that they can produce almost anything, they would be wrong in thinking that it can be produced in one part, with no knowledge of 3d printer.  To design for a single extruder 3d printer is quite difficult, your object can have very little overhang or negative space.  I think of them as the computers in the 80's, you can see potential, but it's by no means perfect.

So, anyway here is my entry.  It is a multi-design cookie cutter, basically, what it does it is cut out cookies in different shapes as your roll it along the flattened out cookie dough.  It took me about 3 hours to design.  To make it 3d printable I hat to sectionalize it into 10 different parts, inside of 5 different .STL's.  If I may say so it looks pretty badass, well as badass as a cookie cutter can be...  Any who this beast(yes I just called a cookie cutter a beast, deal with it), weighs around 86 grams, which depending on where you get your filament from, costs between $1 and $4 to make.  It sports 3 different designs, a snowman, a gingerbread man, and a Christmas star.  On their printers's it took roughly 3 and a half hours to full print.
If you would like more pictures, click here and consider making an account and downloading, it would help me win.


Why did I do this?  The grand prize for the item that gets the most downloads, is an Ultimaker.  An Ultimaker is pretty much the best FFF printer around, it is seven times faster than mine has 10 times the build area, and is way more accurate.  Think of my printer as a hoopty car(Im not sure if it is just my family that calls old, broken down cars this, but that is what I mean)  And an Ultimaker is like a nice Suburu.  I really hope I win. I guess in 3 to 4 week I'll know, I'll keep y'all posted on how its going.  I hope you enjoyed this blog post.  As always have a nerdy day.

Friday, November 8, 2013

The Perfect 3d Printer for Consumers


An example of a Delta printer.  Image courtesy of "SolidSmack"

Here is my idea of a perfect 3d printer, targeted at consumers:

It would need to be fast, while remaining cheap.  So, i would ditch the traditional Mendel style 3d printer, and go with the far less popular delta style of 3d printer.  The delta is much faster because instead of moving the whole print tray, or the whole extruder in a linear motion, it sort of swings the extruder around to create an object making it much faster.  It should be able to printer at 200 mm/s maximum.  This allows you to create most objects in less than an hour.  

The print area should be at least 6x6x6 inches.  This is where Deltas are slightly flawed.  Instead of being a square like a Mendel, it has a circle build tray.  So to get a square object that is 6x6 like a Tardis, you would actually need about 8x8. This is not to big of a problem though, it just equates to a larger overall footprint. The whole printer would have a foot print of roughly 14 inch diameter, and 30 inches tall(the way the Z axis is designed, it has a lot of wasted space while the X and Y axis are quite efficient.  

It needs dual extruder. Not for colors, but for support material.  One of the biggest drawbacks of most 3d printers is that they can’t make everything.  If I told someone to design something to print on my printer, it would likely be unprintable.  This is because my printer like most other sub $3000 dollar printers, have a single extruder, so if anything has overhang it can’t print it well, or even at all.  Dual extruder let you print anything because you can put water soluble support material in the second extruder. 

It needs to cost $300, that is the most consumers can probably afford.  I believe that each printer could cost as little as $350 to make. This leave the only way to make a profit, is through material sales. I think that material should cost $40 for .75kilos. It only costs around 3 bucks to make it.  Take into account that most people use about .75 kilos a month, there could be a very healthy profit with the first year (around $400).


It needs to be launched by a big company, such as Google.  This is because a large company is needed to launch a project like this and show all of the world what it is capable of through advertising.  It would also be the first printer to be launched by a large company, this would help instill trust, that it can deliver as promised.  The printer also needs wifi, so you can print while not being physically attached to the printer.